Sound
Assets
Sound assets are soundtracks used at the Timeline level for playing along with your movie globally. They
are stored in the Sound Asset Panel which is accessible by double clicking the "Sound"
button at the far right of Timeline Strip. The
Sound Asset Panel can be brought up from any section where the Timeline is present (i.e.,
Compose, Play, Save and Gallery). The panel will open on top of existing interface.
Sound
Asset Panel

When you double click the "sound" button on the Timeline,
a 5-tab panel will open on top of your current interface.
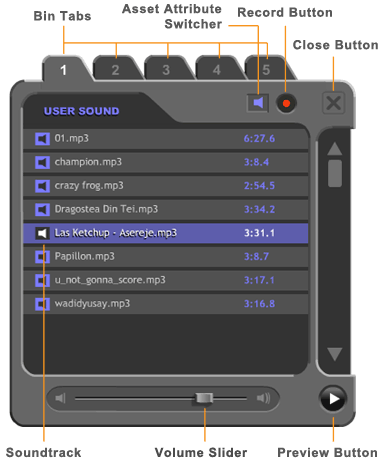
This is Sound Asset Panel (see screen shot above). Clicking a tab will take you to respective bin space where soundtracks are stored. Bin 1 through bin 4 each comes with 2 asset modes: User Mode and Vendor Mode. They are interchangeable by clicking Asset Switcher. Bin 5 (displaying sound symbol in orange) has no Vendor mode, it store User soundtrack only. Depending on the mode you are in, a bin space displays User soundtracks (sound symbol in blue) when it's in User Mode, and it displays Vendor soundtracks (sound symbol in gray) when it's in Vendor Mode. In total there are 5 User sound asset bins and 4 Vendor asset bins.
User Sound Assets
By default Sound Panel is opened in User mode. The 5 bin spaces correspond to the 5 "sound" bin folders in user directory. Your sound assets will show up in corresponding bin space(s) according to the content arrangement of your "sound" directory (C:\Comixware Assets\user\sound). Each listing includes the name of the soundtrack and the length of it in minute and second. The sample screen above shows Sound Panel in User mode.
Vendor Sound Assets
If you have Vendor assets in your Comixware configuration, respective sound assets will show up in the bin's Vendor mode. While user assets are listed as they are (according to the bin folder where user stored them), vendor assets are organized and displayed by package(s). That is, in "Vendor" mode a single bin space can display multiple vendor packages according to your Program's configuration. Each is in the form of a collapsible "folder". Clicking the + sign on the package's title strip will open up the folder revealing its contents; and clicking the - sign on the strip will close up the folder concealing its contents.
Soundtrack Selection
To select a soundtrack for your movie you simply click a desired title from the soundtrack list. The selected track will be highlighted in blue. The selection takes effect IMMEDIATELY.
Now your movie will play with this selected
soundtrack. To make a different selection simply
click on another track in the list to replace the previous one. You can of course try out different
soundtracks for the same movie. Different soundtrack creates different moods for
your presentation.
Only one soundtrack can be selected at a time, and is
used for the duration of the entire movie. So we call this the "global" soundtrack of your movie as oppose to a "local" soundtrack that is used at individual scene level.
Preview Button
You
can preview a soundtrack in the Sound Panel by first selecting it and then pressing the Preview button (see sample screen above) to listen to it. HINT: You can also preview your movie's current soundtrack by single-click the Sound button on the Timeline without opening this Sound Asset Panel.
Volume Control
There is a Volume Slider below the list window. You
can drag it to adjust the volume of the selected soundtrack. The default volume level is at 100% (slider at the far right position). The volume decreases as you drag the slider to the left. The adjustable range is from 100% to 0% (slider at the far left position). You can adjust the volume dynamically while previewing the soundtrack in the Panel.
Close Button
Press the CLOSE button to close the Panel off. Your last selected soundtrack and its volume setting is now saved to your movie. You can also press one of Timeline's PLAY buttons to close off the Panel and start movie playing.