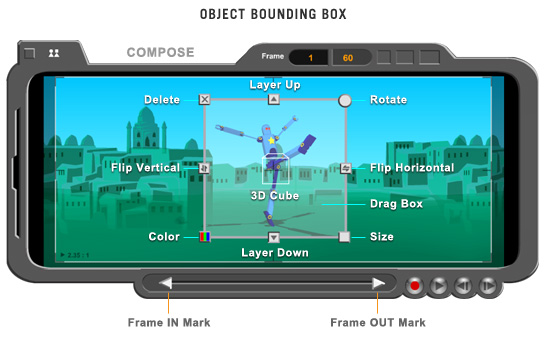
Bounding Box Controls & Buttons
When
you drop a composition object onto Compose stage or click one already on the stage,
a bounding box will appear around this object indicating it is being selected.
A bounding box has 8 control buttons anchored symmetrically at its 4 corners and along its 4 sides.
Other
than a few exceptions, these controls behave
basically the same on all composition objects (Generic, 3D and Text).
They are used to define and adjust various properties of a compositional element: position, size, orientation, color and stacking order.
Drag
control
You can drag an object to any position on Compose stage by "grabbing"
within the bounding box and moving with it (you'd see the hand cursor turning
from open to grab when you press the mouse button). You can also use DIRECTION + SHIFT key to move an object one pixel
at a time (to any of the 4 directions) to fine tune its on-stage position.
Size control
You can drag the square button at
the lower right
corner of bounding box inward or outward to adjust the size of your object (you'd
see a double ended arrow cursor when you move your mouse over it). If you enlarge
an object to a very large size that part of it is grown out of stage, as you release
your mouse, the bounding box will snap back to a default maximum size situated
within the confine of Compose window. This is to ensure that even when an object
is grown out of stage user can still access
all bounding
box controls of respective object.
Tilt control
You can adjust the rotation of an object by turning clockwise or counterclockwise
the rounded button at the upper right corner of the bounding box
(you'll see a curved arrow cursor when you hover your mouse over it).
NOTE: The Tilt function does not display bitmap image (JPEG, GIF, AVI, MOV etc) correctly in Comixware. A tilted bitmap object would appear distorted and constrained within a white canvas. This behavior is normal for bitmap files. However the actual tilt effect on bitmap object will be reproduced correctly when such scene is exported by Movie Exporter.
Flip controls
This function is represented by the 2 side buttons on the bounding box. The right
one is for flipping the object horizontally. The left one is for flipping the
object vertically.
Note:
Flip controls don't work on bitmap objects.
Layer controls
You can bring
an object forward
or backward in relationship to the rest of on
stage object(s).
The 2 square buttons located at the top and bottom sides of the bounding box serve
for this function. Clicking the top button (with an arrow pointing up) will bring
the object one layer forward to the front. Clicking the bottom button (with an arrow pointing
down) will send the object one layer back to the background.
Color control
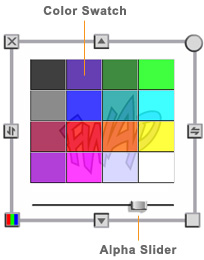
You can adjust the color and alpha (transparency) of an object by clicking the "rainbow" button (at the lower
left corner of the bounding box) to bring up a color swatch. The swatch panel
contains 16 colors and an alpha slider. Clicking on a color will change the tint
of your object to that color, except the black and the white colors. For a vector based object (like SWF), the black
button will render the object totally black and the white button will
return it to its original state. But for a bitmap object (like JPEG), the effects are reversed. The black
button will return the object to its original state and the white button will render it totally white. Moving the alpha slider horizontally will change the transparency of your object: from 100% (the slider's far right position) to
0% (the slider's far left position). Clicking the rainbow button again or clicking outside
of bounding box will turn off the swatch panel. The tint and alpha changes take
immediate effect upon your selection.
NOTE: We generally don't recommend tinting a bitmap object. Because the result varies depending on individual file. A tinted bitmap object cannot be exported predictably either. Its alpha state would be altered. This is normal for bitmap file. However this doesn't mean you can't use this tinting characteristic to achieve effects of special kind. Trail-and-error and experiment are the way to get the result you want.
Delete button
You can remove an object from the stage by clicking its delete button (with an
X in it) at the top left corner of the bounding box. You can also use the
"Delete" key on your keyboard to achieve the same result.