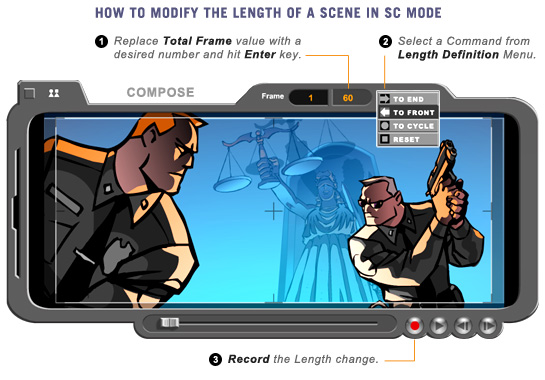
1.
When a scene is in Compose Window, its native length is shown in
Total Frame field (on the right) of the Frame Counter interface.
If the scene is a "movie" clip (e.g. QuickTime,
AVI or SWF movie) the 'total' frames will default to whatever
the movie's original length is. If it's a "still" image file (e.g.
JPEG, GIF or PNG) the 'total' frames will be default to 12 frames
long (one second). Note that both the Current Frame number and
the Total Frame number are user selectable and definable. A typed-in number in either field (with 'Enter' key) will change
the frame position or the length of the scene respectively.
NOTE: The internal frame rate of Comixware is universally 12 frame per second REGARDLESS of the original frame rate(s) of the involved asset(s). This means all variation of media frame rates are conformed and converted to 12fps in Comixware environment.
2.
From the default 'total', you can either shorten or prolong the
scene by selecting the 'total' number and replacing it with a new
number (smaller or greater than the original) then pressing "Enter"
key on your keyboard. Now a Length Definition menu will pop up at the right
of Frame Counter with 4 selectable buttons in it: TO END, TO FRONT, TO CYCLE and RESET. Selecting one of them will change the length of the scene according to respective definition.
TO END: means adding or subtracting frames to or from the END
of the scene. The added footage is the replications (repeats)
of the last frame of the clip. The truncated footage is to be
taken out from the last frame of the clip counting backward.
TO FRONT: means adding or subtracting frames to or from the
BEGINNING of the scene. The added footage is the replications
of the first frame of the clip. The truncated footage is to be
taken out from the first frame of the clip counting forward.
TO CYCLE: means adding or subtracting frames to or from the
end of the scene in a CYCLING manner. For example, if the original
clip is a 24 frames 'walk' animation cycle and the new total is 48 frames,
(by selecting TO CYCLE) the new scene will contain 2 cycles of the original animation.
Vice versa if the new total is 12 frames, the new scene will be
0.5 time of the original length (meaning: 0.5 is missing from
completing the original 'walk' cycle). When TO CYCLE command
is applied to prolong a normal 'one way' action clip, the
new scene will simply repeat itself at the end of the original
clip.
RESET:
This command will reset the total frame of a modified scene to its original length.
Please note that "original" means the native length
of a movie "clip", not the last 'defined' or 'recorded'
length of a "scene".
NOTE:
The shortest length you can define for a scene is 2 frames (1/6
of a second). But there is no limit on the long end. From 2 frames
to infinity, any number in between is OK.
3. Once a command is selected, the Length Definition
menu goes off and the designated change takes place immediately (indicated by respective Definition symbol on the right of the Frame Counter). Now the Record button will turn red reminding you to save the change.
4.
You can continuously make 'length' changes to a scene by entering
new numbers in the Total Frame field (with "Enter" key).
Each change is based on the last "modified" parameter.
For instance, you add 6 still frames to the end of a 24-frame animation
cycle (TO END), and then you use TO CYCLE command to increase the
total frames to 60. This means the new scene will contain 2 broken animation
cycles of 30 frames each.
5.
After length change(s), you can reset a scene to its native length
by using RESET command. To
reset, click on the Definition symbol (on the right of Frame Counter) to bring up the Length Definition menu and select RESET from the menu. Now the scene is reversed to its original clip length.
6. To close the Length Definition menu without length modification simply click outside of the menu to leave the scene as is.
7.
Only when the 'Record' button is pressed the length change is
saved to your movie.